How to use an I²C LCD 16×2
Thank you for purchasing an I²C LCD module from us or just stopping by to find out how to use a generic I²C LCD module. This guide applies to the following I²C LCD module we carry or similar I²C LCD module you can find in the market.
The good thing about I²C LCD module is they only use 2 wires instead of the 6 or more wire required for parallel connection style LCD.
Circuit
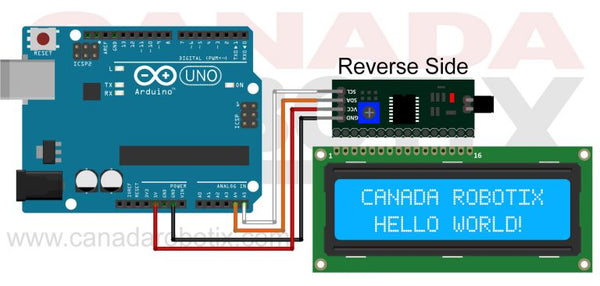
I lied, to connect I²C LCD module, you actually need 4-wires: 5V (VCC), GND, SDA, and SCL, as you can see in the image below. If you have an Arduino or Genuino board, wire your LCD module to the following pins:
| Board | I2C / TWI pins |
|---|---|
| Uno, Ethernet | A4 (SDA), A5 (SCL) |
| Mega2560 | 20 (SDA), 21 (SCL) |
| Leonardo | 2 (SDA), 3 (SCL) |
| Due | 20 (SDA), 21 (SCL) |
More information on the Arduino and Genuino I²C interface.
Wiring

Library
The are several libraries you can use for using the I²C LCD module but the following is one we recommend because we tested it and it works.
Download the library, unzip and copy it to your Arduino > Library folder.
Alternatively, you can use the Arduino IDE’s library manager and search for “LiquidCrystal I2C”.
Note: If you have an older version of this library, it will only work with an older version of the Arduino IDE. Download the newest or update the library to work with the current version of the Arduino IDE.